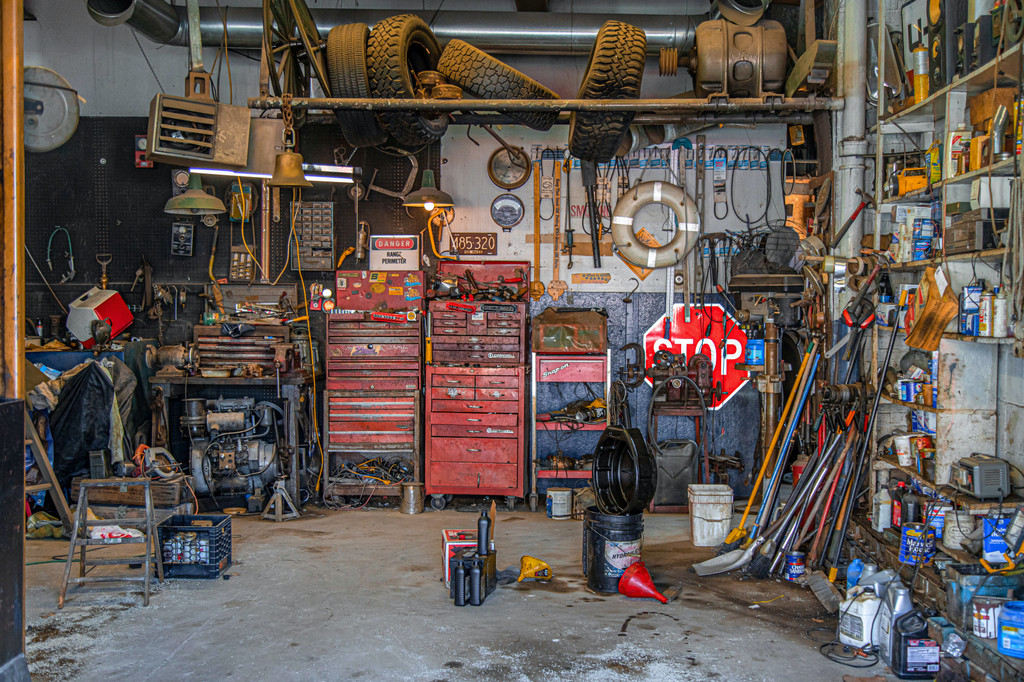
Keeping a clean, organized garage is infinitely more satisfying than allowing it to become a cluttered mess. If you're tired of tripping over your motorcycle in the dark while trying to find your car keys, it may be time to upgrade your garage. Here are five easy steps that will help you get started:
Watch Chris Duffin transform his garage into the ideal workspace where he can keep his tools safe and easy to access.
STEP 1: DECLUTTER
The first step to cleaning your garage is to declutter. This means removing all unnecessary items from the garage, broken items, and anything that is not used regularly. Everything else should be placed in boxes or on shelves and stored elsewhere so you are not tripping over them when working in the garage.
Put aside all damaged items for recycling or repair, and remove old and unused items that can be donated or sold at a yard sale.
Keep your garage organized and clean with a complete Flow Wall system.
STEP 2: CLEANING
The floor is going to be your first priority. You want to eliminate all the dirt and grime, so start by mopping the entire garage with disinfectant.
Next up, you'll need to clean those walls! To do that, use a small mop (like one for cleaning floors) or even just a rag spread with some disinfectant and scrub away at that surface.
Then you'll want to go after those cobwebs in every corner of your garage because they're gross! Use an old broom or duster and some extra-strength spider spray and wipe down every surface where these webs might have formed over time (hint: near corners are usually where they like to hang out).
Finally, ensure you take care of those windows, too — they can get dirty pretty easily if there are no screens on them! We suggest spraying them down with some glass cleaner and then wiping them off thoroughly afterward — but if there's any kind of grime build-up on them already, then try using an ammonia solution instead since this is their natural enemy anyway!
Flow Wall systems are an excellent way to keep your garage organized and clean.
Step 3: Organize Your Garage
The next step is to organize your garage. This can be done with a slat wall system, like the ones we produce here at Flow Wall.
A slat wall system can help keep your garage organized and tidy. It's a wall system that provides plenty of space for storing tools, supplies, and household items. Flow Wall is easy to install, customizable, and can be used to create a workstation in any corner of the garage or even inside your home.
Flow Wall panels come in various sizes, and the slats are adjustable, so they fit together tightly without any gaps. Each section can have hooks, shelves, cabinets, and even countertops.
Additionally, some models come with dividers so you can separate items into different sections; this is especially helpful if you have a lot of tools that need their place since it prevents them from getting tangled up together or falling off when other objects are removed from their slots in the panel!
Step 4: Paint the Walls & Floor
The paint is a key component of your garage’s new look. It will make or break your efforts, so choose wisely.
Easy to clean: Use paint that’s easy to clean! Don't opt for one that has dirt-clinging qualities, as this will defeat the purpose of cleaning it in the first place.
Durable: A garage is going to get a lot of wear and tear — it’s only natural. Make sure you have durable paint to protect against scratches and oil spills.
Touchable: Since you’ll likely be showing off this new garage space, choose a paint that won't leave marks on you or your guest's hands or shoes when they touch it — or, even worse, become stained by some liquid spillage or accident!
A Flow Wall system can help you keep tools and equipment from damaging your garage floor and walls.
Step 5: Designate Zones In Your Garage
If you've replicated a typical suburban garage, you'll have an assortment of cars, trucks, and other vehicles to store. If parked in the same area as your workbench and tools, this can be a problem. Also, storing items like paint cans and lawn equipment alongside your family car isn't ideal for obvious reasons. The solution is to designate specific zones within your garage where different functions occur:
Zone 1: Workbench, tools, and supplies — this zone should be close enough to the door for easy access but far enough away from the rest of the garage so that loud noises won't disrupt family activities (like watching TV).
Zone 2: Cars and trucks — this should ideally be near Zone 1 so you don't have far to go when getting into or out of vehicles, but also not too close so as not to get in each other's way while working on them. You may need more than one parking spot depending on how many vehicles you have; make sure each has enough space around it for easier maintenance work without bumping into nearby objects if possible!
Zone 3: Storage areas for non-household goods like gardening supplies or sports equipment — these things belong outside anyway; consider moving them outside if possible instead of keeping them indoors all year long!
ENJOY YOUR SPACE
Keeping your garage clean and clear will lead to more efficient use of space. It will be easier to find things you need, work in the garage, organize tools and supplies, and make repairs. In addition, keeping your garage organized will give you peace of mind that all of your belongings are safe from the elements.
No matter what you do with your garage, it should be a space that feels good to be in. By following these five easy steps, you’ll be able to turn even the most cluttered and dirty garage into a place where you can relax and feel at home.